How to Effectively Use Variables in Templates
Template variables let you create dynamic, reusable documents that automatically personalize content each time you use them. Instead of editing templates manually for each client, you define placeholders that get filled in when creating a signing session.
Before You Begin
You should already be familiar with creating templates. Variables are an advanced feature - most simple templates work perfectly fine without them.
When Should You Use Variables?
Variables are ideal when you have a document that stays mostly the same but needs certain parts personalized for each use. Here are common scenarios:
- Client contracts: Same agreement structure, but client name, company, and project details change
- Employment documents: Position title, start date, and salary vary per employee
- Proposals and quotes: Project scope, pricing, and timeline differ for each client
- Company branding: Insert different company logos or letterheads dynamically
- Multi-tenant documents: Same form used across different branches or departments
Variable Types
AirSign supports four types of variables:
Text Variables
Use text variables for any written content that changes between sessions:
- Names (client name, employee name, company name)
- Dates (start date, contract date, expiration date)
- Numbers (salary, price, quantity)
- Addresses and contact information
- Custom text blocks (project descriptions, special terms)
Rich Text Variables
Use rich text variables when you need formatted content with styling, such as bold, italic, or multiple fonts and colours:
- Formatted clauses or terms that vary per contract
- Styled descriptions or scope-of-work sections
- Any content that needs more than plain text (headings, bullet points, emphasis)
- The rich text editor is built into the variable configuration — just type and format as needed
Image Variables
Use image variables for visual content that changes:
- Company logos
- Product images
- Letterheads or headers
- Certification stamps or seals
Table Variables
Use table variables when you need structured, tabular data that changes between sessions:
- Pricing tables or line-item breakdowns
- Schedules or milestone lists
- Inventory or parts lists
- Define column headers and default rows in the template, then adjust the data when creating each session
The Variable Syntax
Variables use triple curly braces to mark where content should be inserted:
For example, in your document you might write:
Dear {{{client_name}}},
This agreement is made on {{{contract_date}}} between {{{company_name}}} and the undersigned party...
When you use this template and fill in the variables, it becomes:
Dear Jane Smith,
This agreement is made on December 4, 2025 between Acme Corporation and the undersigned party...
Adding Variables to Your Template
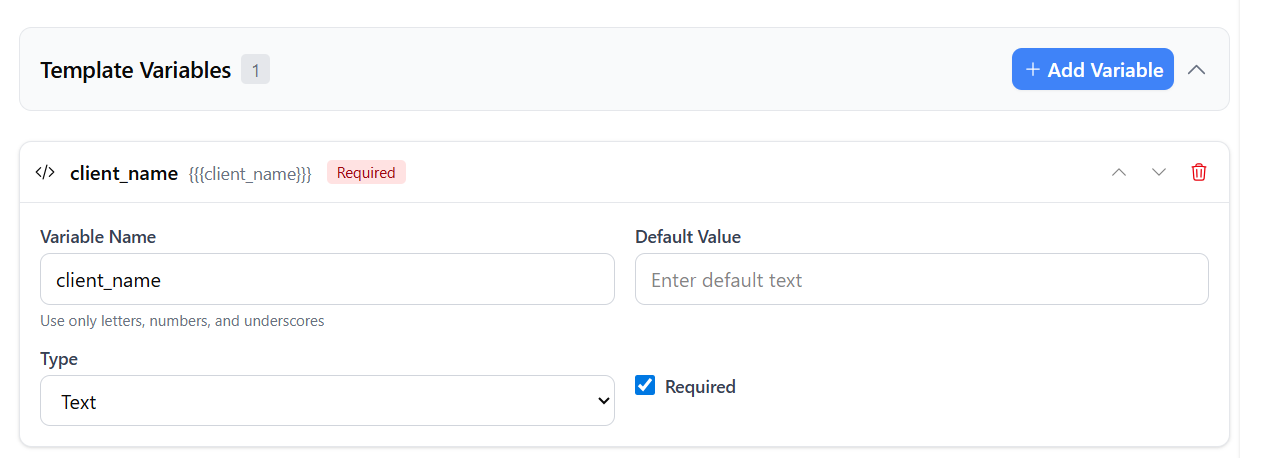
- Open your template and navigate to Step 1: Template Configuration
- Scroll down to find the "Template Variables" accordion section
- Click to expand it, then click "Add Variable"
- Configure your variable:
- Variable Name: Use lowercase letters, numbers, and underscores only (e.g.,
client_name,start_date) - Type: Choose Text, Rich Text, Image, or Table
- Default Value: Optionally pre-fill a value that users can override
- Required: Check this if the variable must be filled before using the template
- Variable Name: Use lowercase letters, numbers, and underscores only (e.g.,
- Add more variables as needed using the "Add Variable" button
- Use the arrow buttons to reorder variables (this controls the order in the fill-in dialog)
Using Variables in Text Fields
- Navigate to the PDF editor step of your template
- Add a Text Input field where you want variable content to appear
- In the field's Default Value, type your variable using triple braces:
- Example:
{{{client_name}}}
- Example:
- You can combine static text with variables:
- Example:
Contract for {{{project_name}}}
- Example:
- Mark the field as Read-only if signers shouldn't edit the replaced content

Using a Template with Variables
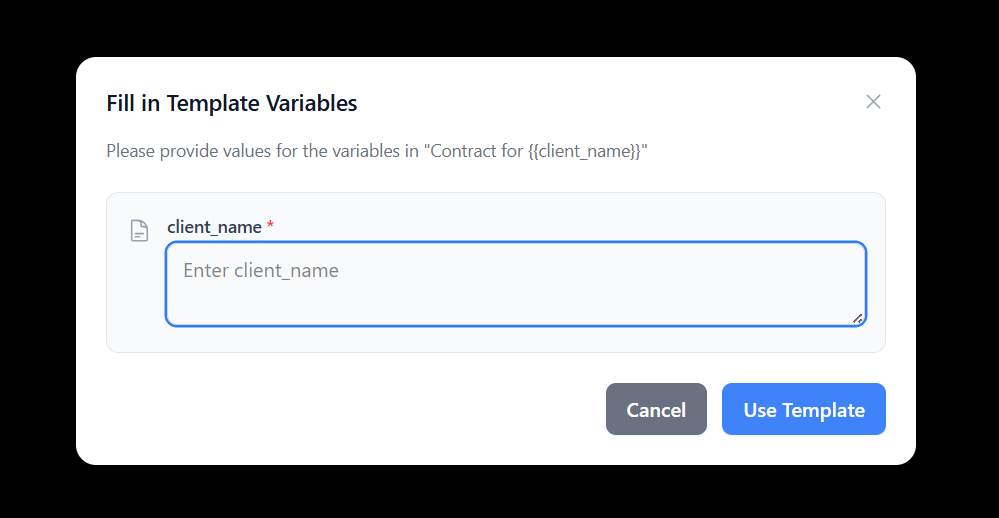
When you click "Use Template" on a template that has variables, a dialog will appear asking you to fill in the values:
- Click "Use Template" from your template page
- The "Fill in Template Variables" dialog appears
- Enter values for each variable:
- Required variables are marked with an asterisk (*)
- Default values are pre-filled but can be changed
- For image variables, click to select or upload an image
- For rich text variables, use the built-in editor to format your content
- For table variables, edit column headers and add or remove rows as needed
- Click "Use Template" to create your signing session
- All
{{{variable_name}}}placeholders are automatically replaced with your values
Best Practices
Naming Conventions
- Use descriptive names:
client_full_nameis clearer thanname1 - Be consistent: if you use
client_namein one template, use it in others too - Use underscores to separate words:
contract_start_date - Start with a letter, not a number
When to Make Variables Required
- Required: Critical information that must be present (client name, contract date)
- Optional: Nice-to-have content with sensible defaults (company tagline, secondary contact)
Setting Default Values
- Use defaults for values that rarely change (your company name, standard terms)
- Leave defaults empty for values that always change (client name, specific dates)
- Default values speed up the workflow - users just confirm or override
Example: Client Contract Template
Here's how you might set up variables for a client services agreement:
| Variable Name | Type | Required | Default |
|---|---|---|---|
client_name | Text | Yes | - |
client_company | Text | Yes | - |
project_name | Text | Yes | - |
contract_date | Text | Yes | - |
project_value | Text | Yes | - |
scope_of_work | Rich Text | Yes | - |
pricing_breakdown | Table | No | Default line items |
company_logo | Image | No | Your logo |
You're Ready!
You now know how to use template variables to create powerful, reusable documents. Start with a simple template with one or two variables, then expand as you get comfortable with the workflow.
Pro Tips
Test Before Sharing
Create a test session from your template to verify all variables replace correctly before using it with real clients.
Keep Variables Organized
Use the reorder arrows to arrange variables logically. Put the most important ones first in the fill-in dialog.
Combine with Read-Only Fields
Mark text fields containing variables as read-only so signers see the personalized content but can't modify it.
Don't Over-Engineer
Only create variables for content that actually changes. If something is always the same, just put it directly in the template.
Need More Help?
If you encounter any issues or have questions about template variables, check our FAQ section or contact our support team at [email protected].